New Upgrade/Replacement TS1000 / ZX81 Keyboard Featuring tactile switches for easy typing.This keyboard is a joy to type on. It makes an excellent upgrade for those who want a keyboard with tactile feel, or for anyone who needs to replace a broken TS1000 or ZX81 keyboard.
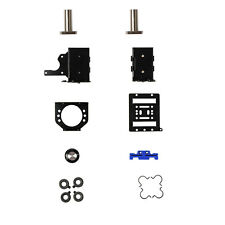
The second photo shows the parts I use to make these: A printed circuit board with pick-and-place surface-mounted tactile switches, two flexible ribbon cables that I solder to the circuit board, and a printed flexible membrane with the key labels that I attach to the circuit board with 3M double-sided foam tape ( shown in roll form ).
TS1000 USERS: Yes you can use this ZX81 keyboard on a TS1000. The only difference is that two TS1000 keys are labeled differently than the ZX81.ZX81 keys are labeled RUBOUT and NEW LINETS1000 keys are labeled DELETE and ENTERPHOTOS ABOVE:
1 - The assembled keyboard as shipped to you.
2 - So that you understand what the assembled keyboard is made of, here is a view of its components: The printed circuit board with 40 tactile switches, one 5-conductor and one 8-conductor flexible cable, the strong flexible plastic keyboard top with the key layout printed on it, thick double-sticky foam tape that mounts the keyboard top to the printed circuit board assembly and provides the precise gap height to clear the switches.
3 - This photo shows the top of a ZX81 case that has had its original keyboard removed. The original ZX81 keyboard can easily be removed with a mat knife to get under an edge of the keyboard and then it is easy to pull it off. This leaves a slightly rough, but clean surface, The photo shows how the two flexible cables of the new keyboard enter the case top.
4 - This photo shows the 2 flex cables inserted in their corresponding connectors. No soldering is required. It is important that you have good eyesight and carefully line up the cable conductors with the connector conductors.
5 - This shows the ZX81 with the new keyboard installed. ( Yes. From the top, I looks just like the original. )
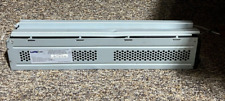
6 - This side view shows that the new keyboard is a few millimeters thick, in contrast to the original which is about a millimeter.
7 - This photo shows the Scotch* brand Double-Sided tape that I use to attach the new keyboard to the case top. You can purchase this common 3M product from the stationery department of you local pharmacy, Staples, or Amazon. You can alternatively use something similar, or various liquid glues.INSTALLATION NOTES: I ship the keyboards with a printed installation sheet and a link to online documentation.
SHIPPING: I generally ship this item in a rigid mailer box via First Class Mail.